What is a Raku Kiln?
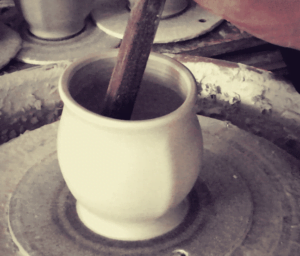
A Raku Kiln is generally a small kiln, which is used to get your pots up to temperature (around 1800F) as quickly as possible, and is easy to open to get your pots out quickly. You have probably seen raku ware out and about. You typically see hand built items with a colourful crackled finish, but it used to be used for black and white chawan tea bowls. The Japanese word raku (楽) roughly translates to “pleasant”, “ease”, and “comfort”. It was bestowed on potter Tanaka Chōjirō as a reward for his making of tea-wares for Toyotomi Hideyoshi. Chōjirō produced bowls that were either entirely red or entirely black glazed soft pottery, simple and without decoration, which were meant to reflect wabi ideals. Traditionally you would remove the pot from the raku kiln at its highest temperature, and let the pot simply cool in the air. Nowadays though, you get all sorts of variations on the raku glazing and raku firing process.. Using crackle glazes, copper glazes, and even horse hair to create semi-determined patterns, using other carbon based material (newspaper, straw and sawdust, for example), and using water to rapidly cool the pots. You can also add alcohol to the mix to produce those bright coloured pots we all know and love. So where do you get started with this firing process? Thankfully, raku is one of the cheapest and fun ways to fire your pots. It is very quick and easy to create a homemade raku kiln.
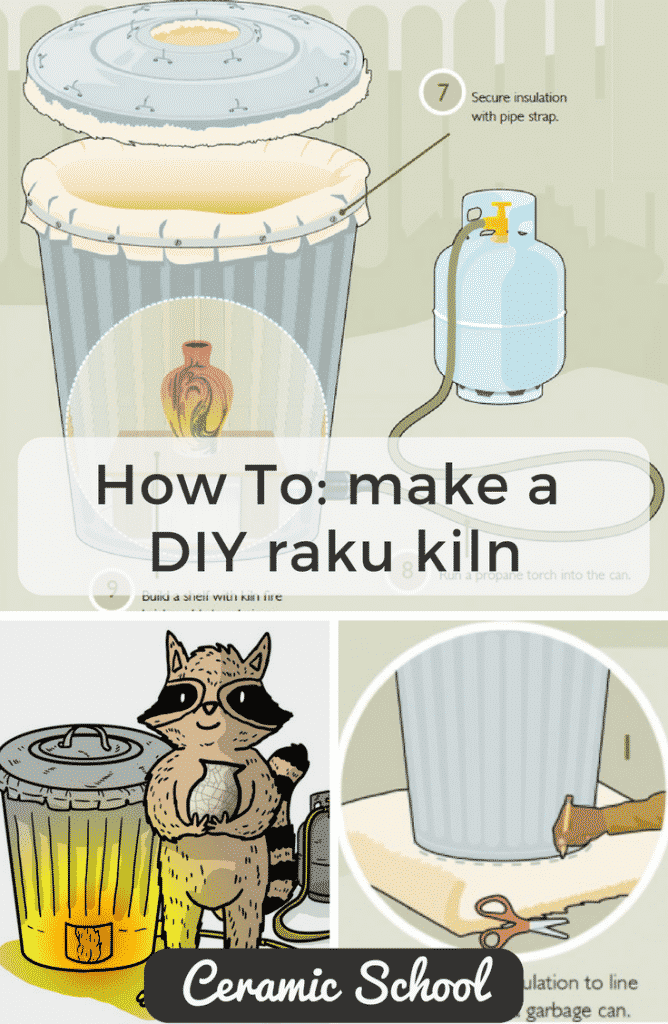
So, are you ready to find out how you can make your own raku kiln? Well wonder no more because below is a step by step process of making your very own raku kiln from a steel trash can.
DIY Raku Kiln equipment list:
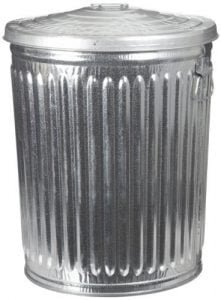
A steel trash can
You can make the outside container of your raku kiln out of basically anything, but we would recommend a heavy duty stainless steel trash can. This is ideal because it’s cheap, and yet the heavy gauge steel used in its manufacture ensures that it is durable and withstands even the most extreme temperatures and weather conditions. It also has a well fitted lid which is well suited for this purpose.
Do not use zink plated or galvanized garbage cans. They can be Toxic, deadly, a hazard when heated.
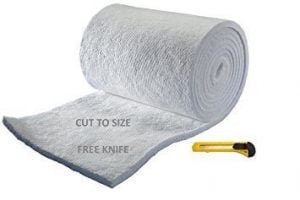
Insulation material
For this project, you will need a ceramic fibre insulation blanket like this 1/2″” ceramic fibre insulation blanket from Morgan Ceramics. This insulating material is super versatile and can be used in temperatures up to 2400 degrees F there it is most suitable for your raku kiln. Check Price.
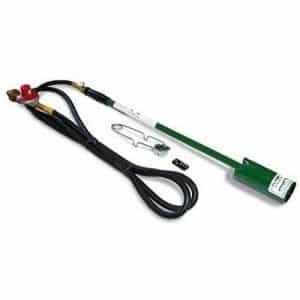 A propane torch
Since this kiln will be fired by gas, you will need to run a propane torch into the trash can. You can purchase the Goede G-2 Stainless Steel Forge/Foundry Burner and 0-30 PSI Regulator with Gauge from amazon. This torch kit can easily be hooked up to any refillable gas tank.
Or, you can double up your burners and get twice the power with the Geode G-4 Burner which is also available on Amazon. It can also be used as a single or double burner setup with the removable hose system. It comes with a 30 PSI adjustable propane regulator with pressure gauge and 4′ hose, a high quality propane/gas divider system with max. burner spread of 21″, and comes with 2 Goede G-1 stainless steel forge/foundry burners with over 130,000 BTU each.
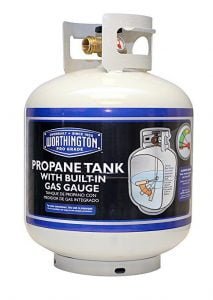 A propane tank
For the propane tank, Worthington 336483 20-pound propane tank will come in very handy as it is very lightweight and comes with a built-in gas gauge, which is very good for this project. Check Price.
If you will be moving your kiln around, then you definitely need a cylinder dolly like the Red Dragon CD-100 cylinder dolly with which you can simultaneously move your cylinder while using the torch. Check Price.

Heat resistant gloves
You will also need good pair of heat resistant ceramic gloves because, well, how else would you remove your already fired raku pottery from the kiln? Unlike other pottery, raku pottery are removed from the kiln while at their highest temperature hence the need for the gloves. A good recommendation would be this Heat resistant cowhide leather gloves from Creative Hobbies. These gloves are foam insulated making them highly resistant to heat up to 450 degrees F. They also have a cotton lining and an inbuilt reinforced thumb for easier manipulation. Check Price.
Ceramic bricks
These are going to be used to make a shelf in the kiln for placing the pottery. You will need three or four of these ceramic bricks to make a stable shelf.
Other Stuff
Additionally, you are going to need handy tools like scissors or a Stanley knife for cutting the insulating material, a metal cutter and a drill for cutting the steel trash can and drilling holes around it respectively. You will also need a pipe strap to secure the insulating material around the edge of the steel can. You should also buy some Fire Bricks to place your raku kiln on.
If you’ve not yet got some Raku clay, we would recommend getting some Amaco 351458 Low Fire Moist Sculpture Raku Clay.
How to build your DIY Raku Kiln
This 8-step guide is as easy as ABC and if done right, you’ll have your ready-to-use DIY raku kiln so you can start producing your own raku pottery.
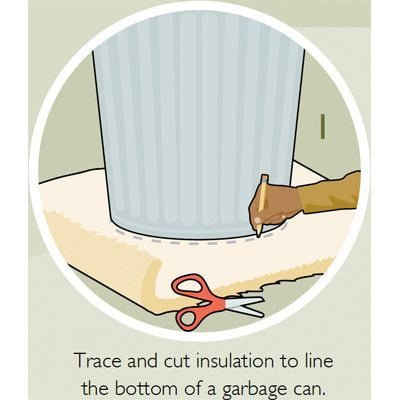
Step 1.
Place the trash can on a section of the insulation material and then using a pen or pencil mark around the base of the can. Next, cut the marked circle of the insulator and fit it onto the inside bottom of the trash can. It should fit perfectly.

Step 2.
Next, line the remaining interiors of the trash can with the insulating material, leaving a few inches of extra insulating material hanging on the edges of the can.

Step 3.
Once the can is completely covered with the insulating material from the inside, slit the hanging extra material in order to easily fold over the outside edge of the opening of the can.

Step 4.
Next, you are going to cut a vent on the lid of the can and on one side of the trash can. The vent on top of the lid is going to ensure air circulation in the kiln to prevent the torch from going off. The vent on the side is where the propane torch is going to be fitted.

Step 5.
Using a drill, drill smaller holes around the vent on the lid and some around the rim of the lid. These are going to be used to secure the insulating material onto the insides of the lid.

Step 6.
Using wires and ceramic buttons, secure the insulating material onto the lid by fitting the wires and ceramic buttons onto the previously drilled holes on the rim of the lid.

Step 7.
Now you are going to secure the insulation on the sides of the can using the pipe strap then build a brick shelf inside the kiln. This is done by placing two bricks a few inches apart and mounting the third brick on top of the bottom two.

Step 8.
Finally, get one of our Rakun T-Shirts to wear, then with everything secured, fit the propane torch on the side vent made earlier. Ensure that it is tightly fitted by adjusting the pilot on the squeezer valve to prevent any leakage. And you have a self-made raku kiln! How easy, right?
You can then place your glazed ceramic piece on the shelf inside the created raku kiln. Make sure it is stable and will not fall off in case of any slight movement. You can then turn on the torch and let the raku magic happen on your ceramic piece! The heat and the smoke created during firing will have beautifully patterned effects on the glazed pottery, which is the beauty of raku ceramics. You can then simply let the piece cool down by itself, or get more adventurous and have a go at naked raku (Read: Naked Raku and Related Bare Clay Techniques on Amazon). You should also watch this video of Andrew Cummins about how he fires his Raku ware.
As you can see, it is quite easy to make one of these DIY Raku Kilns. With the right materials and tools as recommended above, your raku kiln will be ready to use in no time.
Ready to make your own diy raku kiln?
Images by www.popularmechanics.com.

Responses