Keeping your pottery studio organized can be hard work.
Studios are a potter’s personal creative space, and like all creative spaces – they can get very messy very quickly.
Pottery studios vary from potter to potter; we all have our own preference as to where things go, how things are done, and the cleaning of the studio. Other things such as sink locations, windows, doors, outlets, etc, might affect how you have to have your studio set up. As we don’t know how your studio is laid out, we will be discussing a typical studio space. We will say why the studio is set up this way, and how you could organize your own studio if it is in a smaller space.
A well organized pottery studio has everything you need all in one room. This helps you get in the zone & stay in there for longer. It allows the flow of work to smoothly move from one spot of the studio to the next. Even though it is all in one location there are still different sections of the room to keep cross contamination from occurring. The first section of the room would be the clay section.
Clay Section

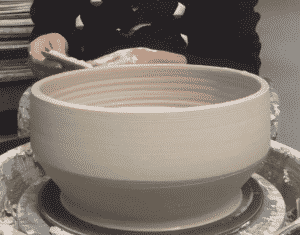
The clay section should be the only location in your studio where you have moist clay and drying clay. This area of your studio is where you can throw, wedge, store moist clay, and store clay that is drying out to be bisqued. You can have multiple tables or one large wedging table that has space enough to do all three. The reason is so you can keep all of your clay in one spot for easy cleanup. If you know there is only one spot where you will have trimmings, slurry, & clay dust, it will be easier to clean with a wet sponge and a mop.
This is also where you should keep your pottery tools that will be needed when throwing and trimming. You can either keep them hanging on the wall to allow for easy access, or place them in containers that can be stored on or under the nearby table, which should be right near your wheel.
This also prevents clay from getting into other areas of the studio as easily so you do not accidentally glaze a piece that still needs to get bisqued first.
Glaze Section

The glaze section should be the only space that contains glazes – in dry and wet states. There should be a sink nearby to allow for cleanup of both clays and glazes. Having a work table to glaze on, plus shelving above – for storing glazes in both states – is a great combination.
Also, placing any pottery tools you need to glaze or make glaze near the work table or glaze storage area will be beneficial for remembering where things are.
If at all possible, you should place a vent near this area to eliminate dust that occurs when mixing glazes. A good vent is great for the safety of your studio. Another good idea is to keep your glaze recipe book near the shelving area where your glazes are stored. This means that you can quickly look back at your book to make sure you mix your glaze properly.
Kiln Section
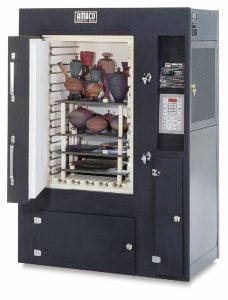
The kiln section is where you have your kiln located. There should be shelves nearby where you can place finished work after it is fired, as well as separate storage shelves that hold your kiln shelves and kiln furniture. Remember that kilns need to be placed on a floor that will not be a fire hazard when the kiln is firing. Concrete is especially good flooring for kilns and can make the entire studio easier to clean up in general. Just remember to seal your concrete floor to minimize dust build-up. If at all possible, you should install a kiln vent. This will give you better firing results and help stop any dangerous gasses getting expelled from the kiln.
Packing & Photographing Section
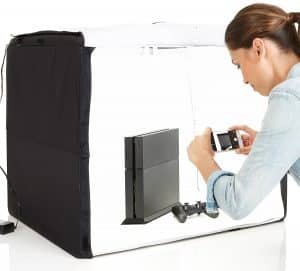
The packing and photographing section is great for potters who want to take professional photos of their work before sending it out either through online or in person sales. Having a table that has gradient photo paper, lights, and a camera will make a great photo area. If you are able to roll back the gradient paper then you can use the same table for packing as well. Storing boxes, bubble wrap, and paper on the lower shelves of the table is great for keeping everything you need all in one place.
This Amazon Basics Portable Photo Studio is perfect for small studios, as it can be packed away when not in use.
If you package and post a lot of things, you can hang a roll of bubble wrap on your wall – this saves shelf space and makes it super easy to unroll as much as you need, and cut it off.
What You Could Do for a Smaller Studio
Now if you’re in a smaller studio (think basement, garage, or spare room), then we have a couple of alternative options for you.
The first thing you should focus on is where you will put your kiln. Will it be in the basement, the garage, or another location? No matter where it is, it should be in a location that is close to the circuit breaker, and away from anything that will be affected by high temperatures. If you are in a small space, you can get a smaller & more portable kiln.
Now, if you cannot place a kiln in your location at all then you should focus on firing at a nearby location. There might be other local potters, small businesses, or clay colleges that will allow you to fire your work for a price. Once you have decided where you can fire your work, it is time to focus on the clay part of your studio.
If you can’t fit the clay section and glaze section in the same room then it is best to break them up. Putting the wheel, storage shelves, and table in a room with hard flooring is best so that you can clean up underneath the wheel and prevent dust buildup. If there is not a proper sink that can handle clay then you can keep multiple buckets in order to store water and clean down surfaces. Having a set of plastic drawers near your wheel can be useful for storing your pottery tools if you do not have space to place them on the wall or under any nearby tables.
Separating the glaze section into another room can work as long as that room also has hard flooring. If it doesn’t, then be sure to mix glazes outside and wear a respirator mask. This will ensure that any carpeting does not harbor glaze materials which can be hazardous to your health. Another alternative option is just to use premixed glazes from retailers so you do not have to worry about mixing glazes outside and bringing them inside. Check out our guide on premixed Amaco Glazes.
Having some shelving to store glazes, and another to store glazed work will ensure that your work is tidy and safe. Remember to have a glazing table in the room and if there is space under the table you can place any tools you may need to glaze there.
If there is room, you can store a table for packing and taking photos as well. If there is not then you can always store that stuff in a nearby closet and take it out when it is needed in order to conserve space in the glazing room.
In conclusion, it is really ideal to keep everything in one room for a studio. However, things will not always work out this way depending on your living situation and income. It is best to adapt and do what you can in the space provided until your circumstances can change. We hope this article help guides you to organizing your pottery studio into sections to prevent cross contamination and make it easier to clean and organize overall.


Responses
Super Art.
These are really useful tips, thanks. Any tips for how to transport glazed work to a nearby kiln? I have the opportunity to fire in my friends kiln and don’t have room / money to buy one but I’m worried about glazed surfaces being ruined en route. Thanks
the information is interesting, especially about having a photography area without all the surrounding messy!! area in the photo.