
Have you been busily working away on mugs, jugs, and all things functional and are ready to spice things up? Are you looking to add a little variety and musicality to your ceramic practice? In today’s article we’ll have you singing a brand new tune with 6 versatile ceramic instruments for you to add to your ceramic repertoire!
Ceramics may not immediately come to mind when it comes to instruments, but clay and music actually have a very long and happy history! Humans have been making music with clay across every single continent from ancient times to the present day. One of the oldest whistles ever discovered was made from clay, and dates back over 30,000 years! We’ve made percussion, wind, and even stringed instruments with this amazing material, and we continue to experiment and innovate.
Are you excited to join this amazing tradition for yourself? Come along as we introduce you to some easy-to-make instruments suitable for a variety of ceramic skill levels and specialties. Get ready to make some noise!
Rattles and Shakers
Rattles by Kelly Jean Ohl
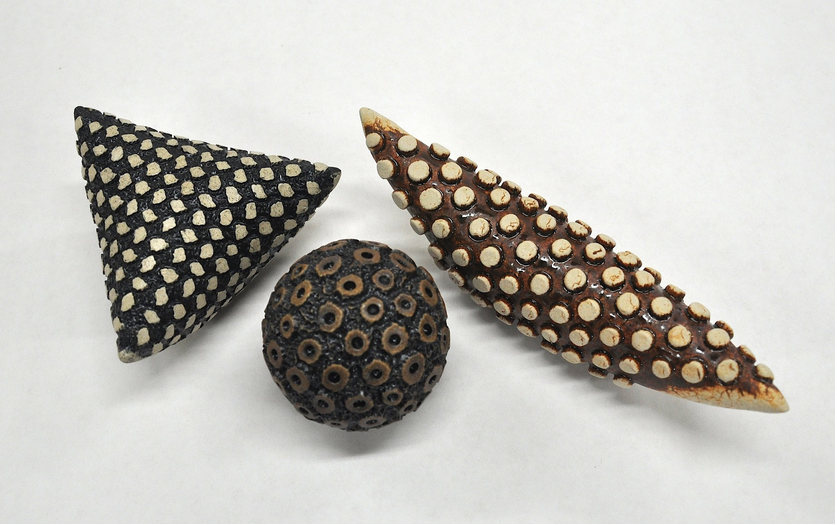
Rattle and shakers are an excellent way to start your musical clay journey. You can use any of the primary methods: coiling, pinching, throwing, casting, and even slab building! Shakers are made to fit in the hand or held with a handle, so your primary functional considerations are weight and comfort. You don’t want to get tired as you shake the night away with a heavy rattle! Because of their simplicity, shakers offer immense opportunities for playing with surface decoration. We all know that instruments just sound better when they look amazing!
To make the shaker, create a bunch of small clay beads, keeping in mind that the size and number will affect the sound. These can be the size of small seeds or as large as peas. No matter what making method you use, the key is to let the beads dry before inserting them in your form and to make sure the interior of your form is not too wet. This will keep everything from sticking together so that you get a nice satisfying rattle.
One simple method for making the exterior of the rattle is to make two pinch pots. Once the pots are firm, place the dry beads into one of the pinch pots and then join the two pots together by scoring and slipping. Add a small hole to one end to ease the drying process, then carve, underglaze, or sculpt the surface until you have a form that you love. Fire, glaze, and shake! shake! shake!
Would you like to see more? Check out this great video tutorial by Andy Ruble.
Ocarinas
https://www.carvedculture.com/blogs/articles/how-are-ocarinas-made

Ocarinas are often the first instrument artists come across when exploring clay’s musical potential, with good reason! They are simple to make and create a beautiful and haunting sound. Ocarinas are a type of vessel flute, one of the oldest instrument families to exist.1 Their creation goes back millennia, and they were particularly common in pre-Classic Mesoamerica and Ancient China. The name Ocarina is Italian for “little goose” and originates from a 19th century maker of the flutes.2
The essence of the ocarina is a vessel with several finger holes and a whistle-style mouthpiece. The bigger the volume of the flute, the lower the overall sound, while the size of the finger holes changes the notes. Like rattles, a variety of making methods can be used. Pinching is the most common approach, and excellent for beginners.
Start by creating and joining two pinch pots together to make your vessel form. Next, blend a rectangle of clay for the mouthpiece onto one end of your form. Insert a popsicle stick through the mouthpiece horizontally so that it penetrates the vessel form. With the stick inserted, cut a small square hole in the top of the mouthpiece, with the side of the square nearest the vessel beveled at a 45-degree angle. Carefully remove the stick, and clean up the edges of the opening. You’ll need a nice crisp edge to make a clear sound. Next, use a hole cutter to create your desired number of finger holes. Your ocarina will be playable right away, so you can easily adjust the hole size and sound as you go. And of course, make your ocarina your own by playing with your surface design!
For a step-by-step tutorial, check out this video. And for a different variety of vessel flute, check out our course on making Tayrona Flutes, a beautiful instrument from Colombia!
Udu Drums
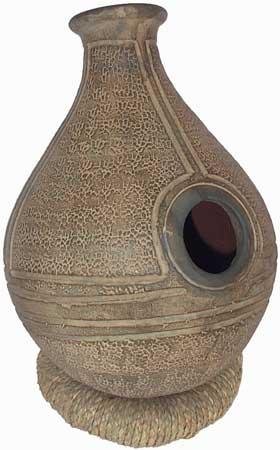
https://globalvillageimports.com/product/clay-pot-udu-drum/
Udus are a beautiful centuries-old ceramic drum originating from Central and South Nigeria.3 Meaning “vessel” in the Igbo language4, the udu is a percussive instrument featuring a gourd-like shape and two sound holes. It is played by striking, tapping, and rubbing the surface with the hands or fingers, and creates a very distinctive wet sound when the palm is quickly tapped and removed from the sound holes. It is a delight to play and a joy to make!
Traditionally, udus are made by slump molding the clay over spherical forms. The neck is then added by coiling and the holes are cut to size.5 You can use this method in your studio as well, or if you prefer, you can wheel throw or coil the entire form. No matter which method you choose, the key to creating a nice clear sound is to have walls of even thickness and gentle curves, and to ensure that the holes are sized so that they can be fully covered by your palm. You will have one hole in the side of the vessel, with the other at the top of the neck. As with ocarinas, the volume of your form will affect the depth of the sound, so play around with different sizes.
Udus offer an excellent excuse to hone your burnishing skills, as the compression created will increase the strength of the walls, and the satin-smooth surface will make your instrument a joy to play!
Ready to get started? We offer an excellent step-by step course! Click here to sign up!
Want to hear this unique drum in action? Click here
Transverse Flute
Transverse Flute By Evolution Stoneware

Transverse flutes are a member of the woodwind family. The earliest recorded transverse flute is the bamboo ch’ih flute from eighth century China6, but you are probably most familiar with the modern metal versions used by marching bands and orchestras. Transverse flutes are long slender instruments held horizontally to the body, and are played by blowing across a mouth hole. They come in a variety of sizes and materials. We are quite partial to ceramic ones, and we think you’ll agree!
Transverse flutes are a great project for the extruder and can also easily be made by rolling a soft slab around a wooden dowel. Once you have a long hollow tube created, cap off one end with a slab of clay. When the clay is firm enough, cut your mouth hole with a hole-cutting tool, about 1-2 inches from the capped end. If you like, you can find the key of your flute by blowing across the mouth hole while using a tuner app on your phone. You can adjust the key by changing the size of the hole; the bigger the hole the higher the sound. Remember, it’s much easier to make a hole bigger than smaller, so it’s always best to start small!
Once you have got your flute’s key established, you can create the finger holes. If you’re not fussy about precise tuning, go ahead and place the holes in positions that are comfortable for your fingers, and play with the sizing. If you are a lover of finely tuned instruments, here is a wonderful video tutorial by Evolution Stoneware. She’ll help you through this simple process!
Play with the length, diameter, hole sizing and placement to create a range of flutes to play with! Keep the edges of your holes clean and sharp for nice crisp sounds that are sure to brighten up your studio!
If you would like to experiment with a different variety of flute, why not try making a ring or circular flute? We have an excellent how-to course with artist Pedro Botafogo.
Bells
A very familiar instrument, bells and chimes appear across all cultures and have long been made out of clay. A percussive instrument belonging to the idiophone family, they consist of a hollow vessel where the rim is struck by an interior hammer or clapper to produce a ringing sound.7 We know how much ceramic artists love vessels, so we think bells are a perfect instrument for you to explore!
All making methods can be used to form bells. You can coil, pinch, slab, cast, or throw, the choice is yours! The main consideration is to have a loop on the interior to attach your hammer after firing, and one on the exterior to hang the bell itself. Your hammer can be clay, or you can play with other materials, just be sure to have a hole for attaching it to the bell. You’ll also need some string or cord to join the two parts together once you are finished. Even thickness is again your friend when it comes to making a clear sound, and size and shape will affect the pitch.
There are so many creative possibilities when it comes to making bells! You can make elegant traditional styled bells, abstract and vibrant ones, or ones that look like mushrooms or jellyfish. Let your imagination guide you, and your bells will surely ring!
To get a sense of the beautiful sounds these instruments can make, check out this video with work by Chelsea Mae.
Goblet Drums
https://bomamusic.com/product/professional-clay-ceramic-solo-darbuka/
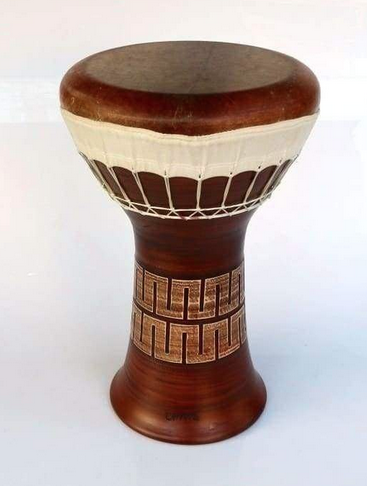
Goblet drums are skin-topped ceramic percussive instruments from Africa and the Middle East that are shaped as, you guessed it, large goblets! They go by a variety of names based on the region and period, such as Doumbek in Persian, and Darbuka in Arabic.8 These are truly beautiful instruments, with elaborate surface designs seen as an integral part of the drum.9 We think these drums are an excellent choice for the maker that loves surface design, and for those who aren’t afraid to incorporate new materials into their work!
Coiling and throwing are your best bets here. If throwing, consider doing so in two parts, first the open-bottomed pedestal, and then the bowl or cup of the drum. When both parts are firm enough to support themselves, rest the bowl on the pedestal to mark out the join on the bottom of the bowl. Next, cut the opening in the bottom of the bowl, about ½” in from the guideline you marked off. Score and slip, and then join your two pieces. You now have the ceramic portion of your goblet constructed and it’s time to decorate! If glazing, leave an inch or 2 around the top opening unglazed so you can easily attach the skin.
Adding the skin of the drum requires developing some new skills, but this is an adventure of its own! You’ll need to learn how to stretch and attach the hide, either by gluing or with cords. Goatskin or fishskin are the most commonly used, and you’ll need to soak your hide in water to get started. For the gluing method, you’ll also need a hose clamp and some white glue. Start by applying your glue to the unglazed perimeter of the drum. Next, drape your skin overtop, slide the clamp over the skin and the drum, and then tighten into place. Now slowly start to tug the skin below the clamp, working your way around the drum, or alternating front-back and side-side. Do this until the skin is as tight and even as you can get it. Now it’s time to let it dry! After a couple days you can remove the clamp and trim the excess skin, you will have a beautiful sounding drum that is equally beautiful to behold!
For an excellent demonstration by some master darbuka makers, check out this video. And if you’d like some more detailed instructions on how to skin your drum, this is the place!
Whistling Vessels
https://www.archaicroots.com/education/unique-instruments-call-whistling-vessels-huaco-silbador/

These unique instruments create a haunting whistling sound that is truly mesmerizing. Found primarily among tomb sites of pre-Columbian Andean cultures, the oldest known examples come to us from the Chorrera culture (ca. 1300–300 BCE) of modern-day Ecuador.10 So beautiful and unique are these instruments that early archaeologists and collectors didn’t even realize that they were designed to make sound!
Commonly in the shape of animals and people, these instruments consist of one or more chambers, a spout, and an internal whistle mechanism made of a hollow ball with a circular, sharp-edged hole. This sharp edge cuts the air blown into the mechanism, which vibrates the air and produces the sound. The air is blown through with your lungs or, depending on the vessel, with water moving from one chamber to another.11 As the water moves, it passes through a connecting passage, which, depending on its length and diameter, helps create a bird-like warble or a wolf-like howl. While we aren’t 100% what the purpose of these vessels was, it’s probable that other vessels of different shapes and sizes were played together, to create a more complex blending of pitches, and a harmonious melody or song.12
Before starting the exciting making process of these vessels, it’s a great idea to check out this video by Steve Mould, where he demonstrates the science behind the instrument using x-ray images and cut-away forms. The secret to the sound of these instruments is hidden, so this will be a big help!
Whistling vessels were originally hand-built, but there is no reason why you can’t play with a variety of making methods. For instance, you could pinch the inner whistle, throw the chambers as closed forms on the wheel, extrude the connecting passage, neck, and spout, and use a slab for the handle! And of course, don’t forget to add a modeled figure or decorative head. Try experimenting with different chamber and passage sizes as well, and be sure to share your results with our community!
To hear some whistling vessels in action, here is a great video for you.
Ceramic Trumpets and Horns
Horn by Donald Bendel https://uwm.edu/studentinvolvement/ceramic-horn/

Trumpets and horns are probably among the first instruments that come to mind when you think of marching bands and orchestras, but did you know that they have been with us since 1500 BCE, or maybe even longer? Early humans discovered that animal horns, open at both ends and played with pursed lips, would make loud, resonant sounds that carried long distances.13 This discovery quickly led to the creation of handmade versions in metal and, you guessed it, ceramic!
There are a multitude of ways to build your own ceramic trumpet. We really love the method used by Gary Kennedy, where he throws the tubular section of the instrument on the wheel using a double-walled approach. As you’ll see in his video, he combines this with extruded sections, and really plays with the length and shape of the instrument. Whatever your approach, keep in mind that trumpets consist of 3 main parts: the mouthpiece, the tube, and the sound bell. By experimenting with the length, diameter, and shape of each of these elements, you will create instruments of unique tonal ranges. And, as always, be sure to bring a personal touch to your instrument with some surface decoration and skillful glazing!
Now that you’re armed with the knowledge and inspiration to unleash your inner musician, it’s time to embrace the musical side of pottery! Whether you’re a seasoned ceramic artist or a beginner getting your hands dirty for the first time, these clay instruments will help you tune up your artistic skills while sounding out a new direction in your artistic journey. Be sure to share your creations on our members forum, the world is waiting to hear from you — literally!
- “History Of The Ocarina.” Phamox Music, https://phamoxmusic.com/history-of-the-ocarina/. Accessed 8 June 2023 ↩︎
- “Top 10 Ocarina Facts – Giuseppe Donati, John Taylor, Zelda…” Ocarina Workshop, https://www.ocarina.co.uk/about-ocarinas/top-10-ocarina-facts/. Accessed 8 June 2023 ↩︎
- Lockett, Pete. “Introduction to the UDU drum pete lockett.” Pete Lockett, http://www.petelockett.com/pete%20new%20pages/UDU%20drumming.html. Accessed 8 June 2023 ↩︎
- “All About Udu Drum.” Sala Muzik, 15 March 2020, https://salamuzik.com/blogs/news/all-about-udu-drum. Accessed 8 June 2023 ↩︎
- Lockett, Pete. “Introduction to the UDU drum pete lockett.” Pete Lockett, http://www.petelockett.com/pete%20new%20pages/UDU%20drumming.html. Accessed 8 June 2023.
↩︎ - “History of the Flute: Antiquity to the Middle Ages.” Musika Music Lessons, 24 June 2016, https://www.musikalessons.com/blog/2016/06/history-of-the-flute/. Accessed 8 June 2023. ↩︎
- “Bell | Definition, History, Uses, & Facts | Britannica.” Encyclopedia Britannica, https://www.britannica.com/art/bell-musical-instrument. Accessed 8 June 2023. ↩︎
- “Darbuka – Duke University Musical Instrument Collections.” Sites@Duke, https://sites.duke.edu/dumic/instruments/percussion/middle-east/darbuka/. Accessed 8 June 2023. ↩︎
- “What Exactly is a Darbuka?” Gawharet El Fan, https://www.gawharetelfan.com/blogs/articles/what-exactly-is-a-darbuka. Accessed 8 June 2023.
↩︎ - Hoobler, Ellen, and Sonia Matheus. “The Art of Knowing When (Not) to Wet Your Whistle: Multidisciplinary Research into the Use of a Sicán Whistling Vessel in the Museum Context.” The Journal of the Walters Art Museum, https://journal.thewalters.org/volume/75/note/the-art-of-knowing-when-not-to-wet-your-whistle-multidisciplinary-research-into-the-use-of-a-sican-whistling-vessel-in-the-museum-context/. Accessed 16 June 2023. ↩︎
- Rodriguez, William. “The Unique Instruments We Call Whistling Vessels- Huaco Silbador.” Archaic Roots, 6 February 2018, https://www.archaicroots.com/education/unique-instruments-call-whistling-vessels-huaco-silbador/. Accessed 16 June 2023. ↩︎
- Hoobler, Ellen, and Sonia Matheus. “The Art of Knowing When (Not) to Wet Your Whistle: Multidisciplinary Research into the Use of a Sicán Whistling Vessel in the Museum Context.” The Journal of the Walters Art Museum, https://journal.thewalters.org/volume/75/note/the-art-of-knowing-when-not-to-wet-your-whistle-multidisciplinary-research-into-the-use-of-a-sican-whistling-vessel-in-the-museum-context/. Accessed 16 June 2023. ↩︎
- “History of the Trumpet.” The Instrument Place, https://www.theinstrumentplace.com/history-of-the-trumpet. Accessed 18 June 2023. ↩︎


Responses