The electric kiln stands as a beacon of innovation and efficiency, revolutionizing age-old techniques with its precision and versatility. Yet, behind its seemingly simple exterior lies a collection of components, each playing a crucial role in the firing process.
Welcome to our exploration of electric kiln anatomy. Whether you’re a total clay newbie or buying your first kiln after years of working in the community studio, this journey promises to shed light on the inner workings of electric kilns.
Join us as we unravel the intricacies of heating elements, controllers, thermocouples, and more, unveiling the technology that transforms raw clay into enduring works of art, and empowering you to harness their full potential and elevate your craft.
The Kiln Exterior
Let’s begin our rundown of our electric kiln anatomy by taking a look at the parts you can see from the outside.
The Lid/Door
Electric kilns are split into two basic types: top loaders and front loaders. As the names imply, the difference in these types is how they are loaded.
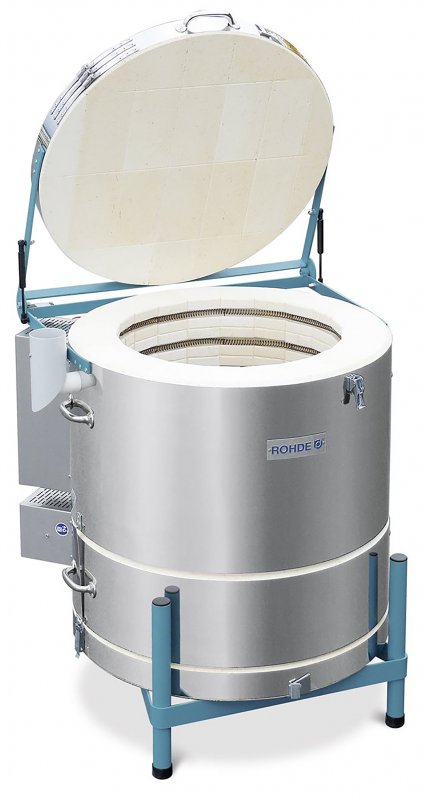
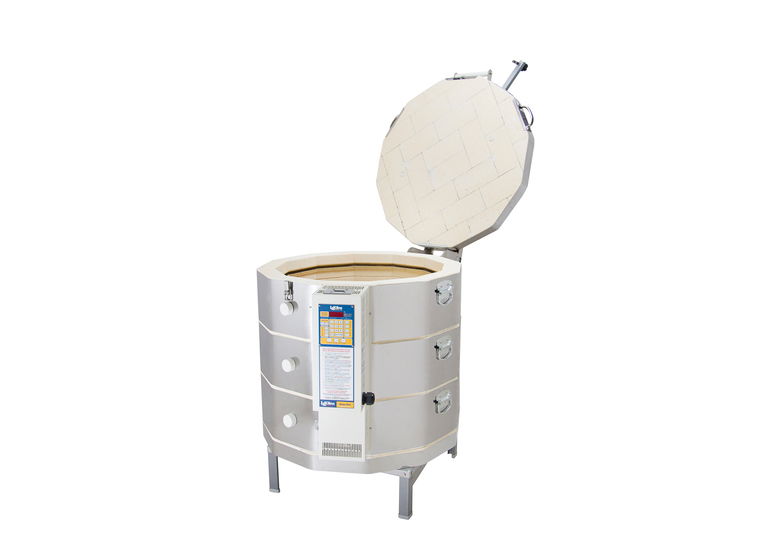
Top Loader Lids
Top loaders have a lid on the top that can either be self-supporting via a spring mechanism, or held open with the added support of a wall-mounted hook. The lid typically has exposed fire brick encased in a metal coat, and is joined to the body of the kiln at the back via a large hinge. The firebrick is essential to the insulation of the kiln, and adds notable weight to the lid. We’ll talk about brinks in more detail shortly.
Sometimes you will also find a vent hole and plug in the center of the lid.
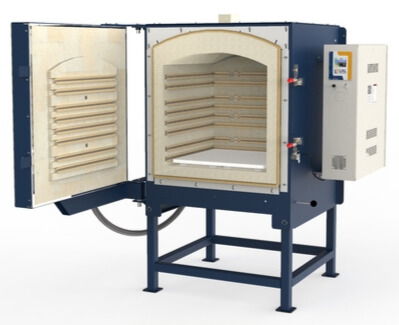
Front Loader Doors
Front loaders have a forward-facing door that swings open, with their hinges located to one side. And while the bulk of the door is composed of firebrick like our top-loader lid, the exterior of the door is usually completely covered in metal.
In both cases, the doors or lids feature a handle, as well as latch for sealing the kiln shut during firing.
Both types have their pros and cons which we’re not going to go into here. But if you would like to know more, check out our article Electric Kilns for more.
Kiln Section
This is the body of the kiln, and the part that holds your work during the firing. With front loading kilns, this part usually consists of a single section, while top loaders are available with removable sections, called chests, that can be used to change the height, and therefore volume of the kiln.
Chests are stacked on top of one another and are held in place by metal latches. They also have chest handles, so that they are easier to lift and position.
In both kiln styles the kiln section is composed of firebrick, and is encased in a metal layer known as a coat. The coat is typically made of stainless steel to resist corrosion from fumes.
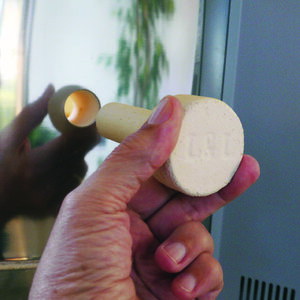
The Peep Hole/Bung Hole and Plug
On the side of a top loader, or in the door of a front loader, you will see a hole 1.5-2 inches in diameter, with a plug made out of brick or another refractory material. This is your peep hole. It allows you to monitor the temperature of your kiln with the use of pyrometric cones, which are placed inside the kiln in line with the peephole. In some cases the peep hole doubles as a vent in lieu of one in the lid, and is left open at certain points in the firing to help fumes move out of the kiln, or to cool the kiln faster.

The Controller
If you are using an electric kiln built more recently than the 1990s, chances are you’re using a computerized kiln. This technological development allowed for significant advantages in terms of firing control, from complex multi-stage firings to increased consistency between firings.
The controller is situated on the side of your kiln within a metal casing. It features a digital touchpad that allows you to set your hold time, ramp speeds, and number of segments, and contains the electronic and mechanical components that make the kiln run. In some cases the digital keypad is separate and wall mounted. Different models have different options in terms of how many segments you can have, so it’s worth doing some research here before any purchase.
In essence, the controller is the communicator between your thermocouple, relays, and elements. It takes the temperature reading from the thermocouple and uses this to activate/deactivate the relays that send electricity to the elements. We’ll talk more on these components once we move to the interior of the kiln.
In older models, you’ll instead find a dial or series of dials that allow you to control the temperature manually. They may be numbered to indicate increasing heat, much like your kitchen stove, or be labeled Low, Medium, and High. This style requires a greater degree of vigilance on the part of the user, but with time it is not difficult to master.
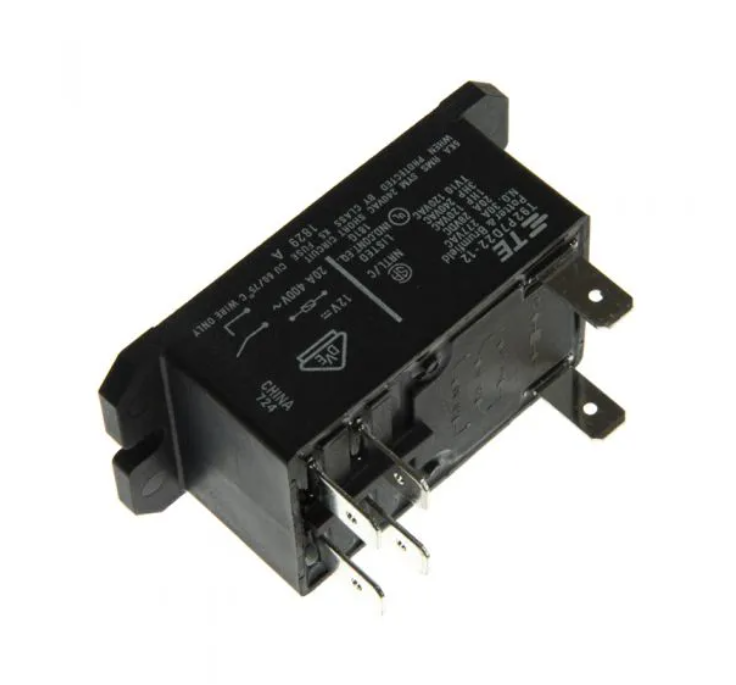
Relays
Located within the controller panel, relays are a component of your kiln that you will hear more than see. They are electromechanical switches that control the electricity sent from the controller to the elements. They turn on and off throughout the firing, resulting in distinctive loud clicks. Because they are mechanical, they can become faulty and need occasional replacement.

The Kiln Stand
This is a metal stand with legs that your kiln sits on to raise it off the floor. Some models are height adjustable, so you can position the kiln at the best height for your body. Others come with castor wheels to allow for easy repositioning.
The Ventilation System
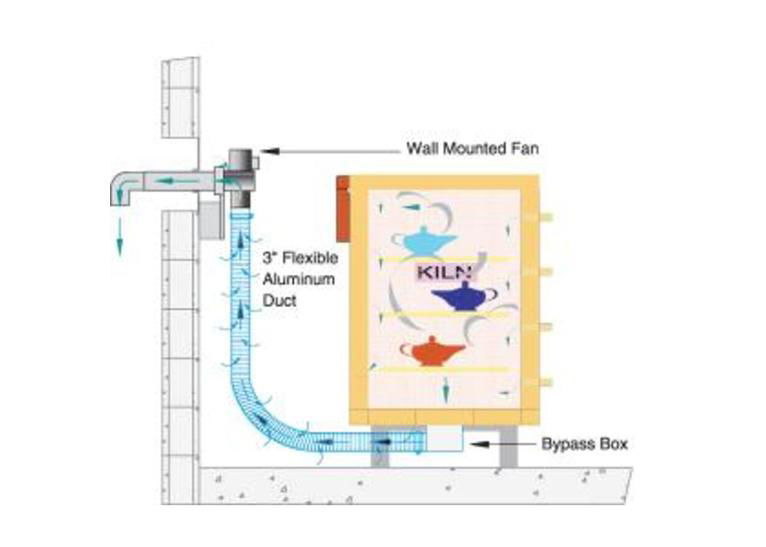
While technically separate from your kiln, this is an essential addition to any kiln set up for removing the fumes that are a part of every firing. There are several models available, and can be designed as a downdraft exhaust, which connects to and pulls air from the bottom of the kiln, or an over-kiln vent that sucks the fumes upwards from above your kiln. Both models connect to exterior walls to send the fumes outdoors.
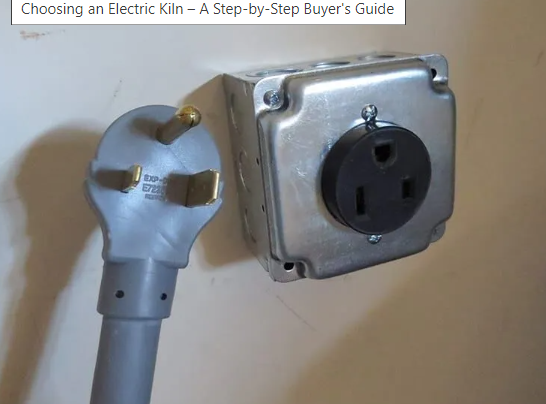
The Power Cable and Breaker
Electric kilns of course run on electricity, so for this they will feature a power cable. Most kilns run on 240v, though some small test kilns are available at 120v. It is highly recommended that your kiln be plugged into its own circuit breaker that can easily be switched off when the kiln is not in use or when it’s undergoing repairs.
The Kiln Interior
Now that we’ve covered the components that you’ll find on the outside of your kiln, let’s take a look at the inside.

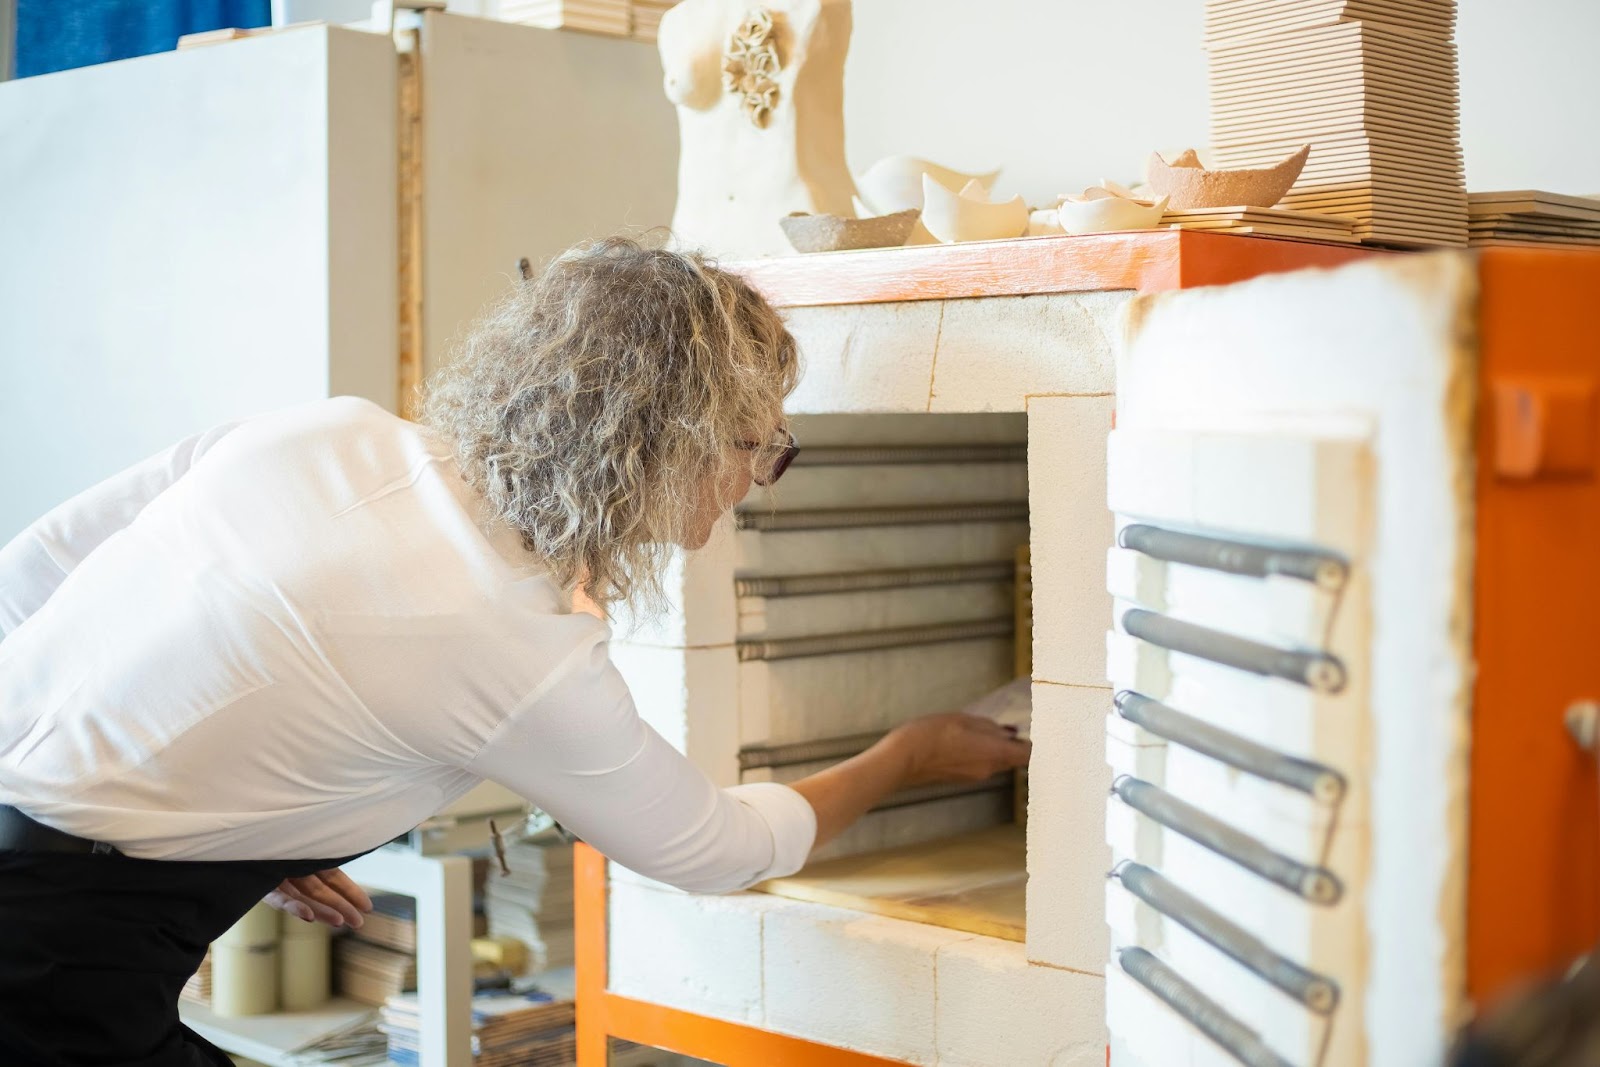
Interior of a top loading kiln
Fire Bricks
The first thing you’ll see on the inside of any kiln, whether it’s electric or fuel powered, are stacked layers of fire brick. These bricks are composed of refractory materials, and they’re our kiln’s insulator, allowing high temperatures to build up in our kiln without escaping. Fire bricks are available in different densities, but in general electric kilns use soft, light-weight bricks, while fuel kilns use hard, denser bricks.
The soft bricks used in these kilns are quite fragile, so extra care must be taken when moving the kiln. These bricks are not glued in place however, so if damaged they can be removed and replaced.
Within the firebrick walls of the kiln, you’ll notice several rows of grooved channels. These are designed to support the second major component of our kiln: the elements.
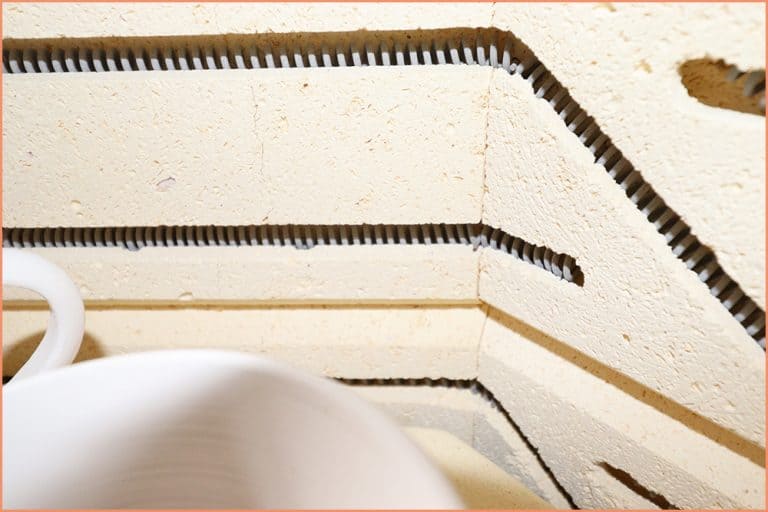
Elements
Also known as resistance coils, elements are what radiates heat into our kiln, by way of an electrical current. When electricity passes through the element, the electrical energy is transformed into heat energy due to the resistance of the heating element material makeup and the interference of the magnetic fields created within the coil. They are long wire coils that rest in the channels mentioned above, and are connected to the controller via the relays. They are made of Kanthal (FeCrAl) or nickel-chrome (NiCr, sometimes called nichrome) wire.
Electric kilns generally feature 3-4 elements. These can be different gauges to support different amounts of electricity (and therefore heat), which allows for a more even heating of the kiln.
Elements are the part of the kiln that requires the most maintenance as they wear out overtime. Their lifespan is impacted both by the temperatures of your firings, as well as the materials you fire. Stoneware firings will wear out your elements faster than earthenware ones, and burning combustibles such as paper will also shorten the life of them.
Another issue that will affect your elements is that the wire becomes soft when heated. This is why it’s supported by deep channels within the firebrick. Overtime, this softening can result in the element drooping out of the groove. If caught early enough this can be easily remedied with the use of a torch to heat the affected section and re-bend it back into position.
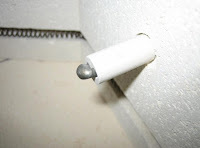
Thermocouple
The thermocouple is what takes the temperature reading inside the kiln. It’s essentially made up of two different metals bound together and when heated, the difference in their potentials produces a very small current. This current can be read by the controller, which the thermocouple is connected to, telling it whether more or less current (and therefore heat) is needed by the elements.
The thermocouple sticks through the side of the kiln, usually protruding about one centimeter from the firebrick, so care is needed when loading the kiln to avoid knocking it. They also wear out over time, generally resulting in over-firing as they do, so they need periodic replacing.
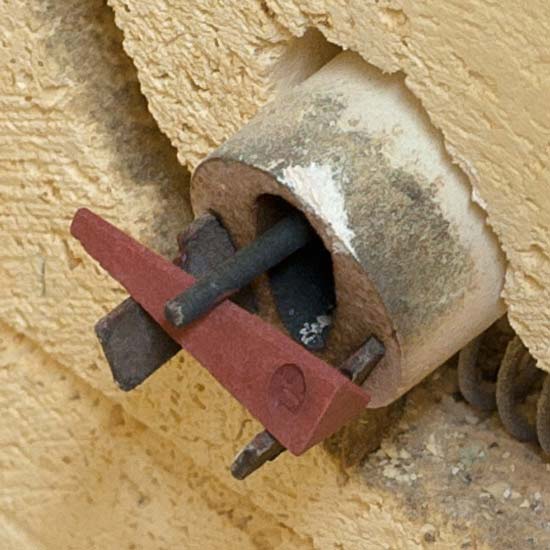
Kiln Sitter
Kiln sitters are a fail-safe designed to shut off power to the kiln once a certain temperature is reached. While they’re still present in many electric kilns today, they’re no longer commonly used due to the advent of computerized controllers and their programmable shut-off. In manually-controlled kilns they are an essential safety feature.
Kiln sitters are a switch consisting of three small metal prongs that hold a special small pyrometric cone (of your target temperature). When the cone is below temperature, the switch is held in the ON position, but when it melts the switch is released and moves to the OFF position, cutting power to the kiln. This not only prevents over-firing, but avoids the potentially dangerous situation of a manual kiln being forgotten while running.
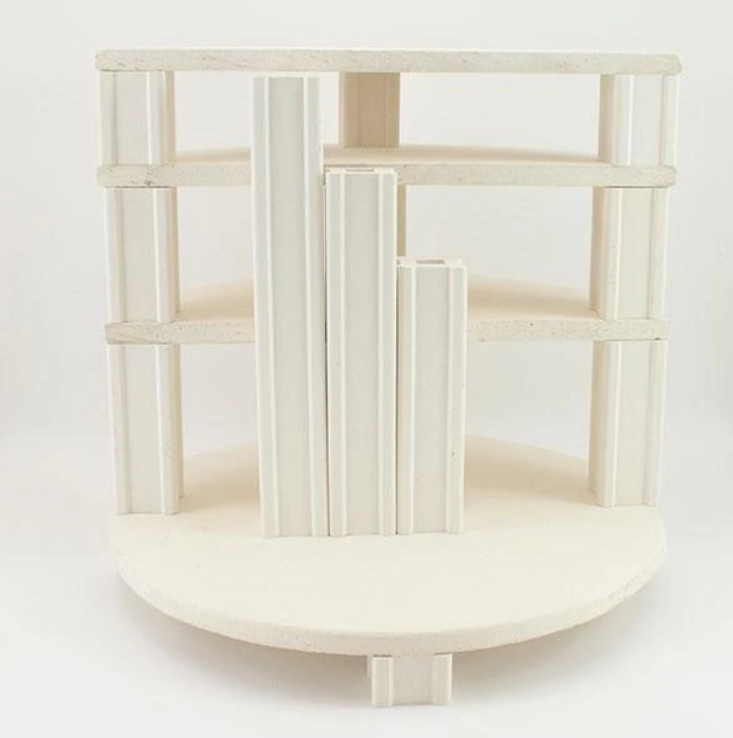
Kiln Furniture
Kiln furniture is not part of the kiln itself, but is essential for loading and stacking your work in the kiln. It consists of your kiln shelves, stilts/posts, as well as props, tile or plate setters, bead racks, or even drip trays. Kiln furniture is made up of dense refractory materials. Traditional furniture can be quite heavy and thick, though thinner, light-weight options, such as those made with silicon carbide, are available at a higher price.
In the case of shelves or other areas of contact with glaze, the furniture is coated with a layer of kiln wash to prevent glaze and pots from sticking to the surface. Tops and bottoms of stilts should be sanded periodically to prevent wobble-causing buildup from the shelves.
That wraps up our journey through electric kiln anatomy. From heating elements, to controllers and thermocouples, each component reveals its vital role in shaping raw clay into enduring works of art. With this newfound understanding, you’re equipped to approach your firing process with increased confidence.
And if you’ve been excited by this new knowledge and would like a deeper look into kiln function, be sure to sign up for Ryan Rakhshan’s workshop “How to Repair and Maintain your Electric Kiln”.

Responses