
When it comes to taking photos of your work it is important to know what to do and what to avoid in order to get the best possible photos. If you are trying to get into galleries, art shows, or art fairs it can be hard when your photos are not good enough. This also applies to artists that post their work online in order to bring attention to their work, sell online, and so on. In this article, we are going to discuss how to take photos of your work and how to edit them.
A Setup You Need to Photograph Your Ceramics
There are many different options which include;
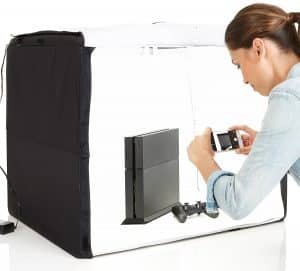
- purchasing a lightbox
- Making your own DIY light box, or having a more open design that just requires a seamless backdrop and some soft lights.

We have an article that discusses the best lightboxes to purchase, along with this post on how to create your own DIY Lightbox. A white backdrop or a graduating one can be very nice for focusing in on your work. If you are sending off your photos to a gallery then it is a good idea to invest in a graduating backdrop
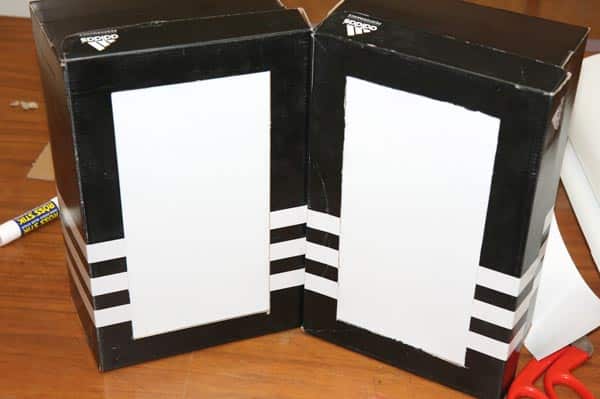
It is important to remember that shiny ceramics will have hotspots where the lights hit them. These hotspots can be diffused using tissue paper or soft boxes. Soft boxes can be expensive so you can always create your own using a white shoe box and tissue paper. You will cut the bottom of the shoebox out and leave a one-inch border around the bottom. Then you will tape the tissue paper over the opening in the shoebox and voila! You have an easy and self-supporting light box that you place in front of lights to diffuse them.
Moving on, once you have your setup ready it is time to place your work in your setup and get ready to take photos. When trying to choose what camera 


Use coupon “TheCeramicSchool” to get 20% off everything!
Now that we have discussed the two different backdrop options, soft boxes, cameras, and tripods it is time to position your lights and get ready. Depending on your preference and how light or dark your work is you can use anywhere from one to three lights. The three locations that you can place you work is on either side of the work or above it. Each location will give you different results with lighting and shadows so it depends on how you want your work to be perceived.
How To Edit Photos of your Ceramics
Finally, it is time to take your photo and then edit in post-production. Taking several photos of your work and getting different angles and groups of your work such as a series of mugs or vases can be a great way to show off a series of work. Once the shoot is over it is time to do a few simple edits to make your work even more compelling to potential customers.
Adjusting Levels
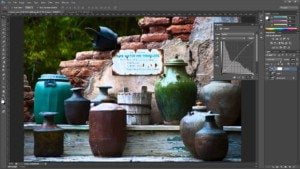
In adobe photoshop
You will start from the right side of the level adjustment and can move the arrow along the slider until you are satisfied with the level of brightness in the photo. Then you can adjust the arrow on the left side to change the level of darkness in the darker areas of the image. The final adjustment you can make is by using the third slider in the center of the histogram which adjusts the brightness of the overall image. You can adjust the photo if it seems too dark or light by using these three scales. There are also presets that you can use as well to try out different possibilities with your photos.
Sharpening your Image
The final adjustment we will do in photoshop 
Other Adjustments
Other adjustments that you can play around with include the radius, which can further enhance detail and reduce noise which can adjust how clean the image looks. There is also an option to remove lens blur, motion blur, and gaussian blur as well in the smart sharpen menu. If you have dirt or scratches on the surface your work is placed upon you can also use a spot healing tool to remove the scratches on the background to remove any distractions. Do not use the spot healing tool on your work to remove blisters, crawling or other faults on your work since that deceives customers who might end up buying it and then are disappointed when the piece is not true to the picture.
Conclusion
In conclusion, there is always more to learn when it comes to photography. This is just the beginning walk through to taking great photos of your work. There are many helpful videos online that teach you to do even more when editing your photos or taking them in the studio. We hope this article was a good introductory lesson on how to take great photos of your work and how to edit them.


Responses