Glazing techniques Introduction
Glazing techniques can make or break a piece, which can be frustrating for those who spend a lot of time on their work only for it to end up getting destroyed by a bad glaze application. In this article, we will cover a few of the different ways you can apply glaze, and provide tips for achieving a great finish every time.
Dipping Glaze

Dipping is the quickest way to glaze a form, but depending on the consistency of the glaze and your skill level it can be one of the easiest ways to destroy a piece. If your glaze is too thick or too watery, it will either start cracking if it is too thick or not fully cover the form if it is too watery. Your glaze should be the consistency of heavy whipping cream, thick but not too viscous. If you find that your glaze is too thick, try adding small amounts of water slowly, until it reaches the proper consistency. While adding water to your glaze, be sure you are stirring it constantly. It is vital to be careful with the amount of water that you add in order to not make it too watery. If your glaze is too thin then you must either remake it or add another, smaller batch of dry mixed glaze very slowly. Remember to both stir and sieve the glaze mix properly until it is completely mixed and at the proper consistency. We recommend using Kemper Tongs

A tip for timing your dip is to fully submerge the form for three seconds to create an even layer of glaze. It is also important to make sure the dipping container is taller and wider than your piece to ensure full coverage. When dipping, it is best to pour glaze on the inside of the piece and swirl it around until it is fully covered and then pour out any excess into your glaze container. This is a quick and efficient way to glaze the inside of a piece without worrying about getting even coverage, especially compared other methods such as brushing.
Brushing on Glaze

Brushing is the most time-consuming way to glaze, but it is vital for reaching nooks and crannies that cannot be glazed with a dip or if your piece cannot be dipped at all. There are also a variety of glazes that are pre-made and ready to use, but are formulated for brushing only. The reason why these glazes are brush only is that they are thicker in consistency compared to standard glazes, and would not turn out properly if you tried to dip glaze with them. Brushing also gives you more control of the surface design with glazing compared to dipping, so for those looking to achieve a certain look or design with their glazes, it makes sense to take the extra time to brush them on. When brushing using a normal glaze be sure to not brush from the bucket. Instead, pour some of the glaze out into a smaller container and stir it frequently before using to ensure it is properly mixed. We recommend the Royal Brush RART-140 Golden taklon
Spraying Glaze

Spraying is the second quickest way to glaze a piece, but there are safety precautions that must be taken when spraying. You must wear a respirator 

Sponging Glaze
On top of cleaning up excess glaze on a piece, sponges 
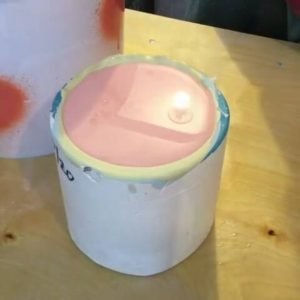
Fountain Glazers
Probably the most fun way to glaze is by building your own DIY fountain glazer. This nifty invention allows you to glaze the inside of your wares at a very quick rate – without causing much mess. Its basically a dish, with a pipe running through that can push air up the pipe, causing the glaze to squirt up – so you can simply hold an upside down mug over the top to get a nice & quick finish. You can buy fountain glazers ready made, but they cost hundreds of dollars.
Tips / Advice for Glazing
Keep your bisqueware as clean as possible. Lotions, oils from your hands, dust, and other particles can create spots where glaze will not adhere properly. If you are finding spots like this on your pieces, start handling your work with disposable gloves
Make sure your glaze is well mixed before applying. If you spot dry glaze caked on the sides, sieving the glaze and mixing it with an electric drill will ensure that it is mixed to the proper consistency. If you need to fix glaze drips you can use a stiff brush to clean out the texture and smooth the layer back down. When it comes to removing unwanted glaze, it is best to clean off as much as possible with a dental tool and then remove the last of it with a damp sponge.
Don’t immediately try to clean off a drip that ran onto a previously glazed section. Wait until it is dry to scrape it off with a dental tool

Conclusion
In conclusion, there are many ways you can go about glazing your pieces. Everyone has their own method and preferences, but we hope that listing out the different options and advice for glazing will help you to achieve more successes than failures from glazing.

Responses