In this video, we see Bill van Gilder demonstrating how to throw a leaf platter.
Bill van Gilder is a potter that resides atop of South Mountain in Central Maryland. He has been a professional potter for more than 45 years. Bill has established and managed two large training pottery centers in Southern Africa. He also has designed a line of professional potter’s tools, called van Gilder ClayTools. Bill’s work focuses on functional forms for use and he glazes in an assortment of ways from high fire reduction to salt firing.
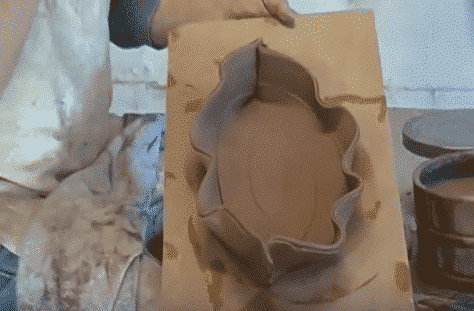
Bill starts by attaching a bat to the wheel head and then placing four pounds of clay on the wheel. He stresses that the clay should be kneaded well in order to ensure that there are no air bubbles in the clay or else they will show up. Bill then centers the clay and compresses down the clay with both hands to lower it closer to the wheel head. He stresses to not make the plate thin in the center or else the piece will tear itself apart. Having a level and even amount of clay is vital to creating the leaf platter. Bill uses a straight wooden rib to ensure it is level, flattened, and the excess water is removed from the surface. He then cleans up the side of the platter using the wooden rib

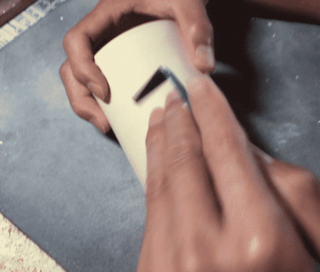
He leaves a single thumb print with the way he handles the clay and then throws the platter at an angle onto a wooden board to change the shape of the platter. Bill keeps throwing the platter to change it into an oval shape by switching the sides he is throwing it from. Once the oval shape has been achieved Bill cuts away the two spots that had his thumb print. A sponge is used to dampen the edges where he cuts and then prepares to turn it into a leave with dry hands. In the two spots that he has cut away his fingerprints, he goes back and presses each side together to create a boat-like shape. He stresses to not worry about how the underside looks yet since that can be fixed later. Instead, he says to focus on how the upper part of the piece looks.
After both sides are attached together he wets his fingers and begins to shape the sides with two fingers to create undulating curves. He does this by pressing upwards along the outside of the leave towards the inside to create the varying curves. Bill finishes the form by adjusting the curves and pinching in the sides more to create a more leaf-like shape. He closes with saying that the stretching of the clay is the important part of this lesson and that every potter should know how to do this.
To see more of Bill van Gilder’s work find him on Facebook @BillVanGilderPottery, YouTube as Bill van Gilder, and check out his website vangilderpottery.com.


Responses