
Having your work dry out too soon is a challenge that potters can face in the studio if they are unprepared and do not have a damp box.
What is a damp box?
It is a storage container or even cabinet that stores the moisture inside of it, which then allows the clay to stay at a consistent dampness for workability. This damp box allows a potter to work on a piece for days or even months as long as the moisture inside of the damp box is maintained. This is convenient for sculptures, hand building, attaching handles, carving, and so on.
There are a few different damp box options depending on your budget. The cheapest method is using a plastic bag and placing it over your work. It is best to be careful of how close you wrap the bag around your piece so you don’t mar the surface. This option is not a long-term solution since if more moisture is not introduced within 24 hours it can dry out, but is a quick and affordable option if you need a temporary cover to keep your work damp. You can also add paper towels to the surface of your work before covering it with a bag if you wish to add moisture to your work, but be wary about the paper towels marring the surface of your work over time if you spray it with too much water.
A different, longer lasting method for damp boxing is to invert plastic buckets over your work. This allows room around your work so you know the surface will be mar free and will be a bit more protected in the studio if others were to possibly bump into it. Using this method also allows you to poke holes to control the drying process, or add a bowl of water inside of the bucket 
Damp Boxes Created By Potters

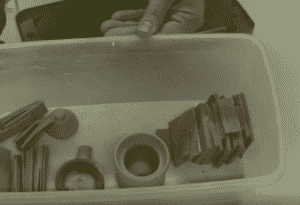
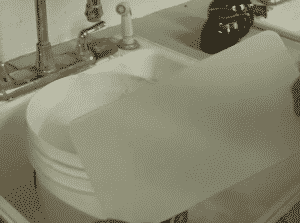
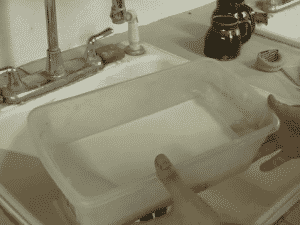
One of the most common and long-term methods used by potters is putting plaster in the bottom of a storage container. In order to do this, you need to get a cheap plastic tote and dry plaster mix. One of the most important steps to ensuring a smooth surface to place your work on is mixing up the plaster yourself, using a combination of water and plaster until it is the proper consistency is reached. Once the mix is free of any clumps and is roughly the consistency of heavy whipping cream, it is best to pour the plaster into one of the corners slowly. As the bottom of the container is filled up evenly to a depth between one and two inches, tapping the sides of the container will help to pop the air bubbles that may be on the surface. If your container is big then it is best to make the plaster a little bit thicker to compensate for the space inside of the box, which takes more water to reach the correct moisture levels. Be sure the wipe down the insides before the plaster cures if you made a mess along the sides to make cleanup easier and avoid having to pick up little slivers of cured plaster from along the sides. After a few hours, the plaster will be fully cured and it is ready to be used as a damp box. Once the plaster is cured and ready to be used you can control the amount of moisture inside by adding water to the surface of the plaster when you want to have more moisture. If you are adding water to the surface of the plaster the rule of thumb is to add enough to where it is soaking into the plaster, but not sitting on top of the plaster – that means you put too much water in there and will need to wipe off the excess. To dry out your pieces, try leaving the top off for a little while before putting your work in to dry out the water that is kept inside of the plaster. Also, if you are worried about plaster attaching to the bottom of your work you can always place some plastic on the bottom of your piece before placing it in the container to keep it plaster free. Check out this video for a step by step process to make this damp box by Tim See!
If your work is too large to fit inside of a storage container there is one final method that you can use. You can make or find a shelving unit and then wrap it in a plastic drop cloth to create a similar method to the plastic bag. If you would like easy access to place your work inside of the damp unit then leaving a bit of extra on each side and pinning it closed with pins to act as a door is a good idea. The major difference is that the shelving unit is large enough to keep your work safe from the plastic and you can place a bowl of water inside of the unit or spray the plastic cloth down with water in order to keep the moisture levels consistent inside.
Damp boxes are also a very handy pottery tool for potters who like to work on multiple pieces at once, take their time with their pieces, and create through sculptural work. If it is feasible for you to create your own we highly recommend that you add this simple tool to your arsenal to allow for more flexibility with your work.


Responses